Chủ Nhật, 8 tháng 4, 2012
Pimp Those Pumpkins!
Today, we're going to go over a very special nail art tutorial that will be just perfect for Halloween! So that you won't get lost, I've kept the design nice and simple. We'll be using mostly staple items that you should always be stocked up on anyway. You shouldn't have to buy any special tools to make this design come out great, so it's perfect for both beginners and seasoned veterans.
It's holiday time, so let's pull out all of the stops and give your clients the bright colours and stylized patterns that they crave!
What you’ll need: glitter tips (purple), rhinestones (purple and orange), stickers, fabric grid, striping tape, glue.
Skill Level: Beginner
So without any further ado, let’s get started!
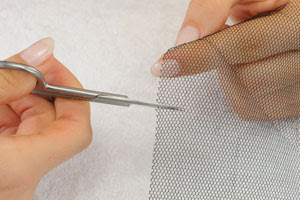
Step 1 – Using your nail scissors, cut a small section out from your fabric grid. Don't worry about making it come out perfect, we'll re-cut this piece later on.
Step 2 – Now, gently attach this piece of fabric grid to one corner of the nail. You can use any adhesive technique that you so choose: nail glue, gel, acrylic, etc. Just don't use super glue!
Step 3 – At this point, it is safe to gingerly cut away the excess fabric.
Step 4 – Now, simply repeat this process on the opposite corner of the nail.
Step 5 – Allow this configuration to dry for one or two minutes. Once this is done, use your scissors to make sure that there aren't any more excess patches of grid hanging off of the sides.
Step 6 – At this point, we can create a border using some striping tape. Attach your tape as shown using a little bit of nail glue. But be careful; do not attach the tape directly to the fabric grid. Rather, it should lie comfortably adjacent to it.
Step 7 – Go ahead and repeat this process adjacent to the other section of fabric grid. If any of your striping tape is hanging off of the edges, gently remove it using your nail scissors.
Step 8 – Now, to really bring our Halloween theme into focus, let's add a cute little orange pumpkin sticker. For the best results, use your orange stick or dotting tool to attach the sticker. Also, I recommend using a little bit of nail glue to make sure the sticker stays in place.
Step 9 – Now you can apply a second sticker if you'd like. Generally speaking, it is good to use two stickers which are at least a little bit different from each other, so as to keep the design from becoming monotonous.
Step 10 – Before moving forward, apply a top coat solution to the areas of the nail which are covered with our fabric grid.
Step 11 – Now we can really bring this design to life by adding a few rhinestones to the cells of the fabric grid. I like to use more than one colour when doing this. In our example, I've used orange and purple, to match both the pumpkin stickers and the purple nail tape. Use a rhinestone picker, orange stick, or a dotting tool to attach the rhinestones.
Step 12 – Alright, now let's apply a healthy layer of top coat to finish off our design and keep those rhinestones fixed in place.
You're done! You've created an attractive Halloween themed nail art design without even breaking a sweat!
One word of caution: although I've always found the process of applying fabric grid to be fairly simple, some people do have a little trouble with it. But trust me, all it takes is a little practice and you'll be working like a pro. Alternatively, you could use special grid pattern stickers or even a Konad solution if you'd like; however, you won't get the distinctive three dimensional look that you've seen here.
Happy Haunting!
Đăng ký:
Đăng Nhận xét (Atom)


Không có nhận xét nào:
Đăng nhận xét