
Today I'm going to teach you how to create a beautiful butterfly nail art design using a free hand nail art technique. This is a great design to use on clear tips, but it really works great over just about any colour. For clients who desire a brilliantly colourful look, this is the perfect design. And since this pattern can be used with just about any colour scheme, it's great for matching with outfits for special occasions.
The most important element of this design is the tiny butterfly pattern that you see above. Since this element is so crucial, it is a good idea to practise painting butterfly shapes alone on a blank nail surface a few times before attempting to complete the entire design.

What you’ll need: acrylic colour powder (pink), liners (blue, pink, black), top coat, dotting tool, rhinestones.
Technique: Free Hand Painting
Skill Level: Intermediate
And without any further ado, let's begin!

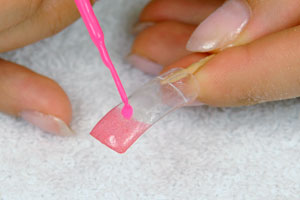
Step 1 – The first thing that we want to do is put down some sort of colourful background. This can be done using colour powder, coloured gel, or even glitter. You can either just colour the front part of the nail or you can do the entire nail surface. In any case however, it is a good idea to create some sort of contrast.
Step 2 – Next, use pink liner to draw a single oval in the shape of a flower petal over the prepared area of the nail.

Step 3 – Now repeat this process three more times to create a butterfly design.

Step 4 – Now, use a blue liner to create a second butterfly repeating the same movements.

Step 5 – To make your butterflies really stand out, you should now use an extra thin nail art brush in order to create a thin black lining around the butterflies.

Step 6 – Use the same thin brush to draw two small antennae on each butterfly.

Step 7 – To further brighten up your design, use a dotting tool to create several colourful dots in a random configuration throughout the nail surface. You should use an average of ten dots per nail.

Step 8 – Now, use top coat to seal your design.

Step 9 – You're not done yet! This design will look even better once we add some sparkle to it. Use a rhinestone picker to apply rhinestones or Swarovski crystals to the centre of your butterflies. Choose a colour that works well with your design.
Now remember, you don't have to painstakingly follow the colour scheme that I've demonstrated here. In fact, the results will be even better if you choose a colour scheme that is specially suited to your client's tastes. You can pick one or two great colours for the butterflies, or, if you want the design to really stand out, you can paint each butterfly a different colour!

Once you've mastered this technique, don't be afraid to experiment a little bit. I've found that butterflies look especially great on top of French nails. Why not? Even customers who usually eschew complex designs often have an affinity for this simple but striking pattern.
Không có nhận xét nào:
Đăng nhận xét