
Here I am again with a brand new nail art tutorial. This one's called “One Last Bit of Flower Power Before Xmas” Yes, that's right, I'm giving you a bright and shiny pattern even though winter is starting to get under way. If your clients are at all like me, they're going to want to savour every last moment of sunshine before the heart of winter sets in. This design features fresh colours that will jump out at them and warm their hearts.

What you’ll need: acrylic colours (yellow & dark green), glitter liner (gold), black liner.
Technique: Free Hand Painting
Skill Level: Beginner
Let's get started!

We'll be using acrylic colours in this tutorial, so for the sake of organization and efficiency I'm going to recommend that you use a colour palette. This will help you to stay organized and furthermore will make clean-up much easier later. Now, let's squeeze out a small portion of green acrylic colour onto the palette.

Now squeeze out some yellow colour into another section of your palette. You will need about twice as much yellow as green, so plan accordingly, keeping in mind that when all is said and done you won't really need that much of EITHER colour. So don't squeeze out any more than you actually need.

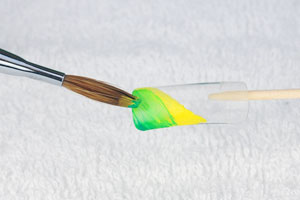
All right. Now that we have our colour situation worked out, we can start working on the nails themselves! The first step is to cover a small portion of the nail surface with a bit of yellow acrylic applied with a soft nail art brush.

Without hesitating, proceed to apply a layer of green colour over the yellow layer. There is no need to apply more than a singly layer of green as you want to allow the yellow to show through to create a nice light green colour.

Now that you have achieved this basic tone, apply an additional layer of green to the edge of the nail so that you will have a series of graded colours moving from yellow, to light green, to dark green. Leave this for two minutes or so to dry.

Once the patters is dry, use a black liner to start painting a few small flowers over your design.

Now, you don't need to worry about getting your flowers perfect. In fact, its better if they are at least a little bit uneven so that we can achieve that innocent looking “flower power” look that we're after.

Paint between two and four flowers on each nail, making sure to make them look natural and uneven.

To give your design a more ornate quality, you can add simple circles in the space in between your flowers.

As soon as you have the flowers in place, use a dotting tool to place small uneven yellow acrylic dots all throughout your design.

Now use the same dotting tool to add golden centres to your flowers giving them a bright glitter filled look. If you want, you can use Swarovski crystals or rhinestones in this step instead.

Finally, finish up your design with a layer of top coat.

That’s it! Now your clients have a fresh and fun design to brighten up those dark winter days. As an alternative, if you want a more precise looking design, try using the Konad technique to achieve perfectly formed flowers in a more elegant looking configuration.
Không có nhận xét nào:
Đăng nhận xét